Showing posts with label Holidays. Show all posts

Sunday, May 12, 2013

Oh my Mom....


My Mom is so cute...
look at her gettin' her run on...so proud!


Happy Mother's Day Mom!

Love you xoxo


Cheers,
Messy

Sunday, March 10, 2013

I am.....

HERE!!!!!


I left Ontario on Friday night and drove 24 hours and I am here!!!
 
Disneyworld here I come!
I'm pretty excited!
 
My Competitive Dance Team is here competing in this HUGE competition!
I'm so pumped!
 
So, while I am gone, I have done reposts of my old DIY's that some of you may not have seen!
Hope you enjoy them!
 
Can't wait to share my Disney stories with you all!
 
 
Cheers,
Messy

Thursday, February 14, 2013

DIY & A Little Love to You

Happy
Valentine's
Day!
 
 
To all the lovebirds in the world, hope you have a wonderful day!
 
Here's a super cute Fortune Cookie DIY!
You probably have all the things you need just laying around your home.
Felt, paper, hot glue gun, pipe cleaners, candies :)
 
First trace circles on your felt using a mug as a guide.
I used red, pink and burgundy felt.


Cut a pipe cleaner so you have a piece the size of the width of the circle.
Hot glue gun it onto your circle felt right across the center.


Write up some lovey sayings on small pieces of paper to tuck into each fortune cookie!


I picked cinnamon hearts and smarties to put inside my fortune cookies.

 
Fold your circle in half and glue the outside rim with all your goodies inside.
 
 Once your glue is set, bend your little half circles in the center...this creates a fortune cookie!!!


 Hope you all have a LOVELY day!

Cheers,
Messy


Tuesday, January 1, 2013

Happy New Year!!!

Hey Everyone!
 
Happy New Year!!!
 
I just got home in the wee hours of the morning...then went straight to a friends party, but I will be back tomorrow with some great posts :)
 
 
Cheers,
Messy

Monday, December 31, 2012

I'm Comin Home...

Well,
it's my last day in Hawaii!
I leave this afternoon and as much fun as Hawaii and my family was...
I'm looking forward to my own bed!! :)))
 
I'll be back with some awesome Maui posts soon!!!
 
Cheers,
Messy

Tuesday, December 25, 2012

Monday, December 24, 2012

Santa's coming...

I can't wait to wake up with my nephews tomorrow and enjoy Christmas!
They are just too darn cute!
 
Hope you all have a safe and happy Christmas Eve!
 
Enjoy opening pesents with all wee one's and cherish the memories!!
 
Cheers from Maui,
Messy

Sunday, December 23, 2012

I'm here...

I am on my/if not already there, way here...
 
 
I'm doing this...


Catch you in a few days!
 
Cheers,
Messy

Saturday, December 22, 2012

PL Peek ~ Our Christmas Morning!

I know for most of you, your Christmas morning is still 3 days away.
But since I am going away, Tally and I decided the 21st would be our "Christmas".
 
 
I made my mom's traditional Wife Saver (will share the recipe soon!) for breakfast and we opened our presents.
I have never in my life been so excited to give someone their present.
I just knew Tally would love it and be sooooo shocked!!!
 
 
It was an excellent morning just me, Tally and Chuck. :)
Bliss.
 
Cheers,
Messy


Wednesday, December 19, 2012

My Christmas Wishlist!

Here are some things that I really NEED/want...hahahaha


Oster Hand Blender W/ Blending Cup
Christmas Tree Top Star Lighted Holiday Decoration Original Box


1. A vegetable steamer
2. Chevron rug from Urban Outfitters
3. Oster Hand Blender
4. A Vintage star tree topper
5. Turtles Chocolates - my faves!!!


I'm sure I can think of more...LOL

Cheers,
Messy


Thursday, December 13, 2012

PL Peek ~ Christmas Baking Day!

Me and a whole bunch of my lady friends got together and had a bake day last week!!!
 
It was so much fun!
We got an unbelievable amount of things made and they all turned out delicious.
 
Here is some photos of our super exciting day!!!
 
 
Cheers,
Messy


Thursday, November 29, 2012

DIY Week!!!

Hey Y'all!!!
I've decided that since I have been doing so many Christmasy DIY's lately that I am going to do a 12 days of Christmas DIY's!!!
I will start posting them on December 1st at 11:00am eastern time and there will be a new DIY everyday after for 12 days!!! :)
I will still be doing my regular posts, but there will also be a BONUS DIY Christmas post!
Fun eh??
I have some great things planned and I am super duper excited!
See ya here Saturday for my first project!!

Cheers,
Messy

PS: Don't forget to enter for my 100 Followers Giveaway! :)))


Wednesday, October 31, 2012

This is How I Cook & a DIY ~ Severed Fingers

I've seen these fingies all over Pinterest and in magazines.
I also saw them years ago because my friend Chi-cheena's mom used to make them all the time.
 
 
I used to bake cookies, or cupcakes or pops and take them to my friends houses on holidays.
Valentine's day, Christmas, St. Patty's.
I sorta lost my mojo last year when life went to crap...but today I am doing it again!!!
I think my friends will be excited to see the return of my holiday baking! :)
 
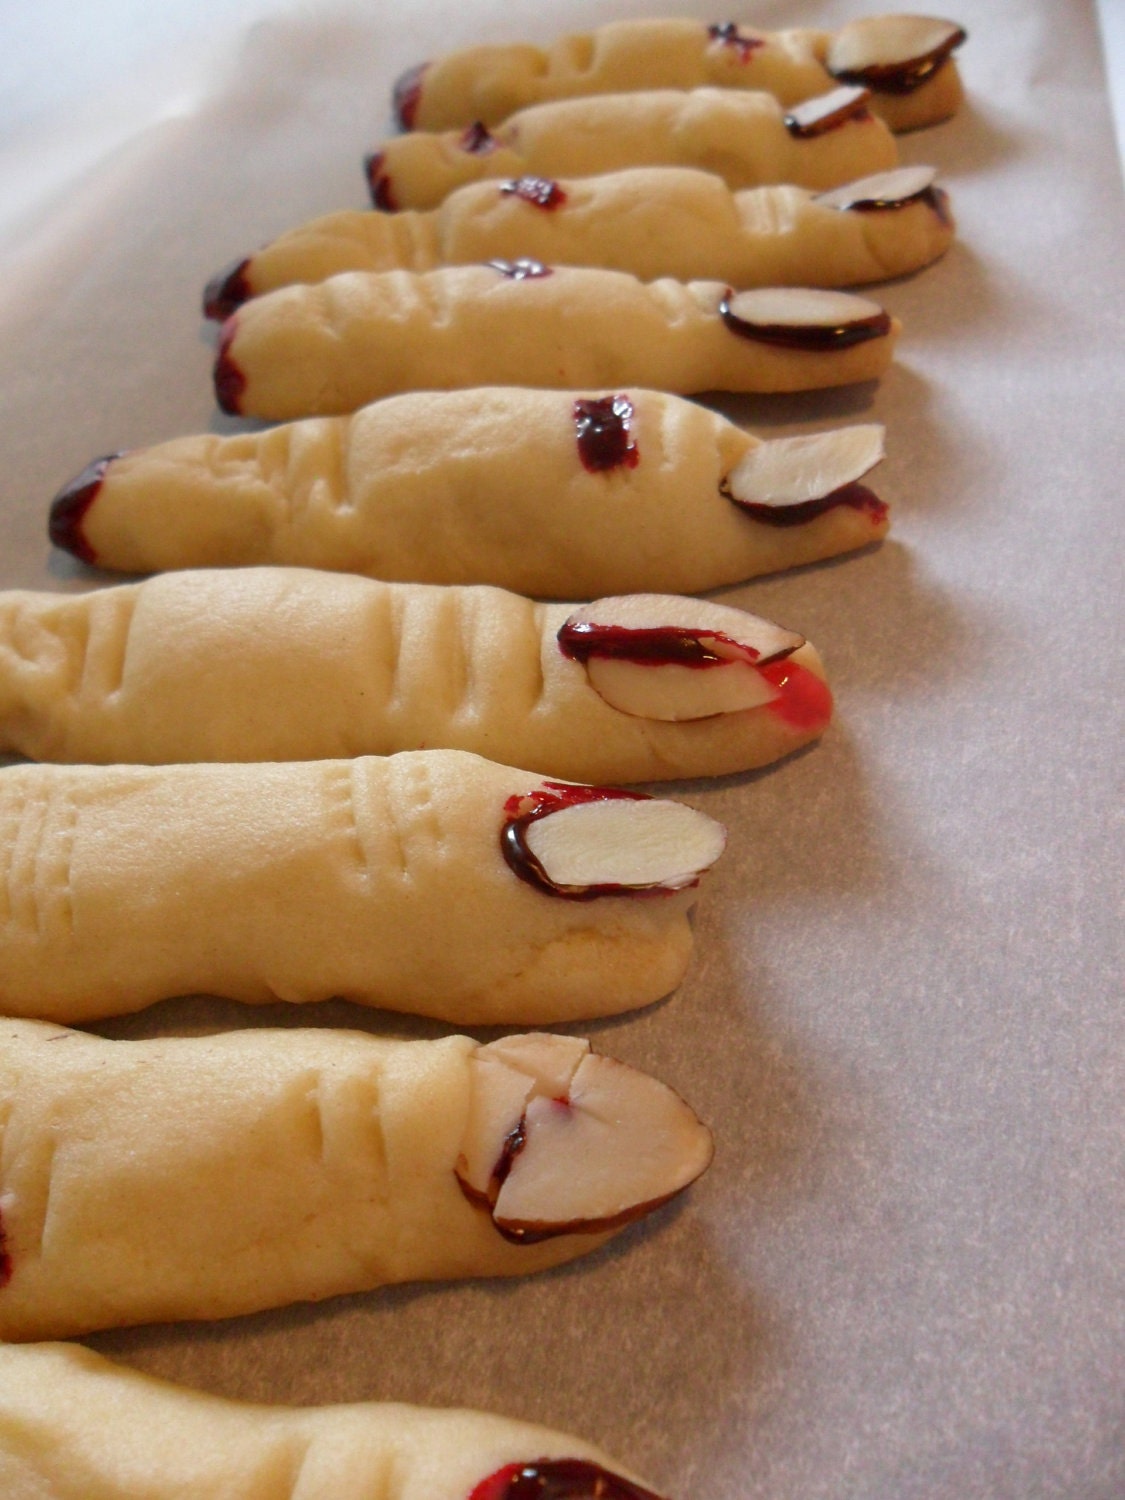
I have always wanted to try and make the fingers myself, and I'm not gonna lie...they TASTE great. Hahahaha...
Maybe they don't look that great.
My blood is not bloody looking!
 
But, oh well...a cookie is a cookie in my books and they taste delish!
 
Here's how I did it.
 
I got the recipe  from the Rachel Ray Website here.


Ingredients

  • 1 cup unsalted butter, at room temperature

  • 1 cup confectioners sugar

  • 1 egg

  • 1 teaspoon pure vanilla extract

  • 2 3/4 cups flour

  • 1 teaspoon baking powder

  • 1 teaspoon salt

  • 1/2 cup sliced almonds

  • Raspberry jam

Directions

  1. In a large bowl, beat the butter until creamy. Mix in the sugar, egg and vanilla, then mix in the flour, baking powder and salt. Cover the dough with plastic wrap and refrigerate for 30 minutes.

  1. Preheat the oven to 325 degrees . Using your hands and working quickly, roll a heaping tablespoon of dough into a finger shape. Place the fingers about 3 inches apart on an ungreased cookie sheet. Stick a sliced almond on 1 end of each for the fingernails. Use a table knife to make three crosswise knuckle marks in the middle of each cookie. Bake until lightly golden, 20 to 25 minutes. Transfer to a rack to cool.
 
3.  Meanwhile, in a small saucepan, cook the jam over low heat until it reaches a saucy consistency. Once liquefied, remove from the heat and pour into a small bowl; dip the severed end of each cookie into the sauce.
 
I packaged mine in these cute boxes I picked up at the Dollar Store.
I just laid some paper towel in the bottom and placed them in.
 
I also made some spooky ghost tags.
 
 
All I did was draw them out and cut the ghosts from white paper.
 
 
I drew eyes and a mouth on them,  and hole punched the top.
 
 
I wrote my message on the backs and signed them from Chuck Norris (my pup) like I always used to.
 
 
I will be off to deliver these the friendly units soon!
 
 
Happy Halloween everyone!
 
Cheers,
Messy

HALLOWEEN!!!!

Happy Halloween Everyone!!!


I love Halloween, and even though I didn't decorate or do much this year, I still love it.
 
Here are some Halloweeny Etsy stuff I love too!!!
 
Halloween Skull Head in gold: Mr. Smiley
 
Eerie Severed Fingers Cookie Perfect for that Gory party and Halloween Great Party Favors
 
Small Halloween glass Pumpkin - Opaque Orange with Gold brown stem - glass garden art
 
Twisted 12"  Barbed Wire Corner Spider Web For Halloween
 
Leather Purse Clutch Goth Halloween Witch Wiccan Pagan
 
I hope you all have a very happy and safe Halloween with all your munchkins.
Looking forward to reading all the posts and seeing the costumes!
 
Cheers,
Messy

Monday, October 29, 2012

DIY ~ Kitty Ears

Halloween is a comin'!
I got to dress up on Saturday!
 
It was the dance studio's Chili Dinner & Show Fundraiser.
I went as a kitty and needed some ears.
 
What you need:
 
- cardboard
- black felt
-pink felt
- scissors
- glue gun
- headband
 
First cut out four matching triangles from the cardboard smaller than the size you want your ears to be.
 
 
Next, cut out 4 triangles from the black felt larger that your cardboard ones by 1/4 of in inch all around. Leave extra at the bottoms of the triangle.
 
 
Using your glue gun, glue a cardboard triangle inside two felt triangles NOT gluing along the bottom.
 
 
Cut out to small pink felt triangles and glue in the center of each of your ears.
 
  
Glue your ears onto the headband wrapping the extra felt around and securing underneath.


I present to you...
 
KITTY EARS!!! :)


Cheers,
Messy